Philosophy and Culture
Reference:
Borisov A.V.
The main methods of introducing design elements and graphics in video
// Philosophy and Culture.
2022. ą 3.
P. 73-87.
DOI: 10.7256/2454-0757.2022.3.37609 URL: https://en.nbpublish.com/library_read_article.php?id=37609
The main methods of introducing design elements and graphics in video
Borisov Aleksei Vladimirovich
ORCID: 0000-0003-1471-0524
Leading graphic Designer, All—Russian State Television and Radio Broadcasting Company Russia-Culture
115162, Russia, Moskovovskaya oblast', g. Moscow, ul. Shabolovka, 37

|
gl3ansky@yandex.ru
|
|
 |
|
DOI: 10.7256/2454-0757.2022.3.37609
Received:
25-02-2022
Published:
03-04-2022
Abstract:
The subject of the study is the process of many aspects of audiovisual creativity that must be taken into account when creating a video. The object of the work is to create a movie trailer through the use of design elements and graphics in the video sequence. The study examines the trailer of a post-apocalyptic fantasy genre called "Genesis", in which the two main characters are depicted as opposites. The work examines and describes in detail all the stages of creating a video trailer for the film, including visual representation (rendering the texture of the central objects, choosing a font to display the title of the film, controlling the movement of actors and moving frames), audio accompaniment of the video sequence (music, voiceover, sound effects). The paper notes that the main goal of all the stages of trailer development considered in the article is to create an audiovisual project of professional quality. The main methods used in the study are visual effects modeling and 3D modeling in Houdini, creating realistic matte paintings in Photoshop and video compositing in Nuke. The main conclusions of the study are those specialized programs that allow you to create a high-quality author's product. This software will become the core of the project, since it is in it that all the elements will be combined into one final clip due to the high-quality integration of various objects of the scene. The novelty of the research lies in the fact that within the framework of the work, the characteristics of the possibilities of working with various video editors and graphic programs were carried out, which together help the creators of movie trailers and other similar products to realize the tasks of entertainment and quality of the projects produced.
Keywords:
design, graphic screensaver, graphics, documentary film, editing, manipulation, artistic language, expressiveness, 3D modeling, graphic editors
This article is automatically translated.
Introduction. To date, one of the urgent problems of the film industry is the creation of high-quality products, namely trailers for films, since it is this small video sequence in terms of volume and duration that carries a number of important functions, the main of which is the viewer's interest in watching the film [10, p. 280], and the quality of this "means of promoting cinema" [1, p. 79], in turn, directly affects the success of a cinematic project, its popularity at the box office and payback. To date, much attention has been paid to improving the quality of video creation by researchers and practitioners in the field of graphics and design [2-4, 7, 8], since the penetration of graphic and design elements into the video sequence positively affects the result of the project, its entertainment and effectiveness. Goal. Characteristics of the main methods of introducing elements of graphics and design in a video using the example of creating a trailer for a movie. Tasks. The goal dictates the following tasks of the work: - characteristics of the main stages of creating a video product; - consider examples of using graphic elements based on several movie trailers; - determination of the most effective programs for the development of graphic elements and their implementation at the stage of visual accompaniment of the video. Methods. The main methods used in the study are: - visual effects modeling and 3D modeling in Houdini; - create realistic matte paintings in Photoshop; - video compositing in Nuke. The results obtained. Preparation for filming always starts with an idea. The initial concept began with the fact that it was necessary to create a thriller based on fictional characters in a post-apocalyptic environment, since this is one of the genres of cinema that most attracts the author of the study. The plot is based on a character who wakes up with no memory in a world that has been consumed by destruction, and he needs to know what happened to try to save what's left. To do this, he will be guided by his main instinct and will eventually try to find a magic cube that will provide him with all the answers he is looking for. However, during the journey, his energy begins to fade, and the cube finally turns off before he can get to it, meaning that he will never get his memories back. A significant factor in this project is the use of color. The two main sequences will clearly differ in the primary color of the images, since the first will be based on pale unsaturated colors, and the other will be based on green. The cube and the guardian's eyes will have a shining green color, the main character's eyes will also turn green, but they will fade, and eventually the saturation will decrease. Having thought over the concept of the project, it was necessary to identify references to previous projects that have some similarities with it, since they can be useful and give the necessary inspiration. In order to know exactly what kind of look and aesthetics are needed for the trailer, a document was created in which many images of objects and examples of what needs to be included in the project were collected. These images will be useful when creating and integrating 3D models or effects that will be implemented in the final images. The study examined a trailer for a post-apocalyptic fantasy genre film called Genesis, in which the two main characters are depicted as opposites. A significant factor in this project is the use of color. The two main sequences will clearly differ in the primary color of the images, since the first will be based on pale unsaturated colors, and the other will be based on green. The cube and the guardian's eyes will have a shining green color, the main character's eyes will also turn green, but they will fade, and eventually the saturation will decrease.
The element that collected the most images was the cube, as it is the most complex 3D model in this project and the most important. The idea was that it was supposed to be black and textured with green lighting around it, so the searches were based on this concept. in the second color sequence, flat geometric shapes of contrasting black to the main background will be used [5, p. 838]. 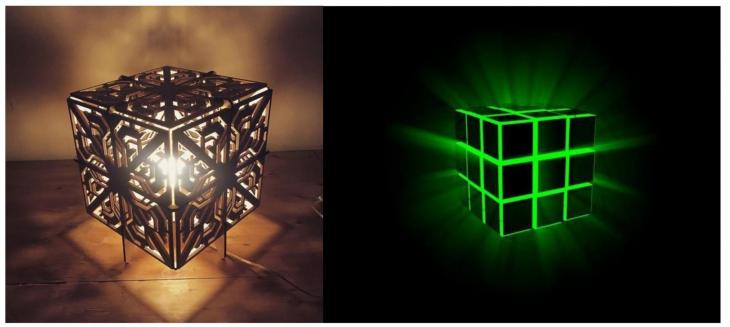
Figure — 1 Shapes and color references for a cube The cube had to be placed in the forest, so references were sought (Fig. 1) for ways to integrate and shoot in this environment. 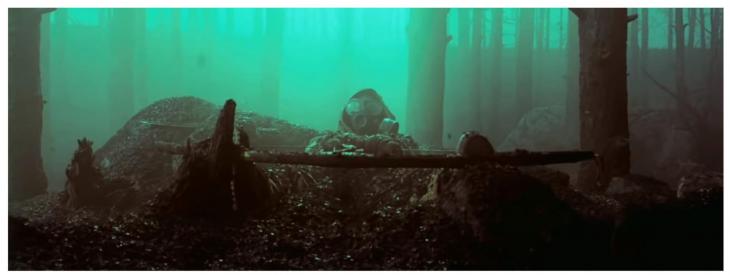
Figure — 2 Frame from the trailer of the book of Eli (2010) Texture is what is the source of inspiration for superimposing some objects on the scene environment, they can also greatly influence the appearance and location of various shots. 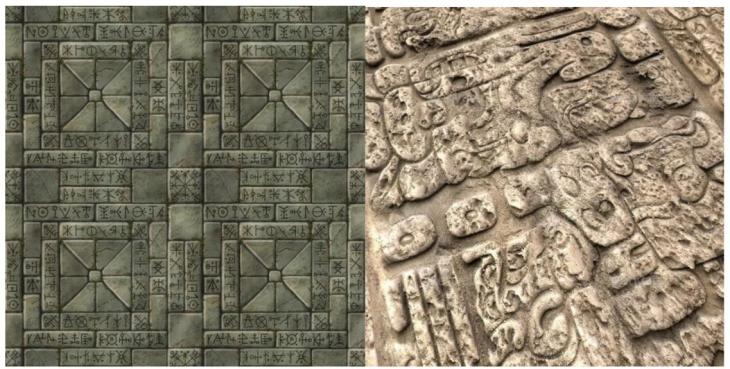
Figure — 3 Texture links for the project The textures were supposed to resemble old temples and mystical jungle ruins (Fig. 3). This sequence was made as mysterious as possible, and these patterns are what I allow to achieve mystery. Finally, different typography designs were considered for different titles that will appear in the trailer (Fig. 4, Fig. 5). Mainly films were analyzed, in the titles of which heavy sans-serif fonts with textures and interesting lighting were used. 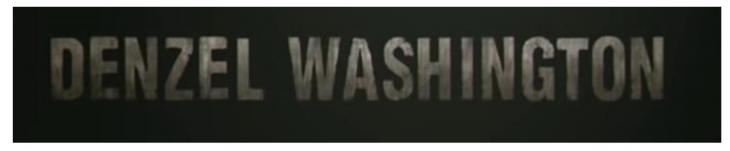
Figure — 4 The name of the main character in the Book of Elijah 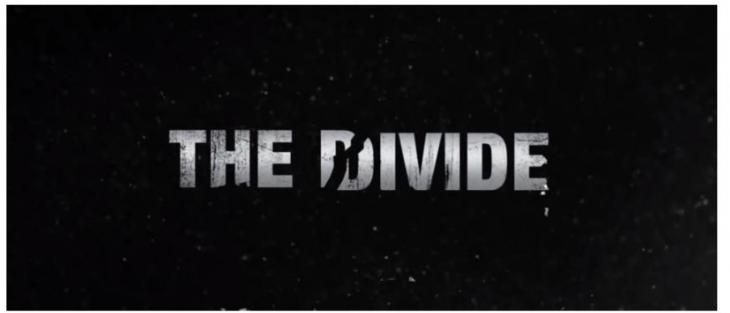
Figure — 5 Inscription for the trailer of The Divide (2011) When the basic idea was completely clear, it was necessary to put it on paper and think about how to embody the concept that the author had in the pictures taken by the camera. Storyboard is the most useful tool for this, as it offers many options for indicating camera movement, lighting, actor movement. In this case, the creation of a storyboard using special software, such as Storyboarder, was not considered, which is associated with large time costs. Therefore, the storyboard was carried out manually [9, p. 54]. The last important thing to consider in each frame was the movement of the actors or objects inside it. Finally, details such as transitions between frames and notes about lighting or possible effects were recorded. The audio part of the project is divided into three main sections. The most important of these is undoubtedly the music, as this is the guiding principle on which the theme and mood of the trailer will be based. The chosen song fits well into the mood that is characteristic of the trailer — it's a job Stephen Price's "Emma" from the original soundtrack to the movie "Rage" (2014). The second part of the audio part is a voiceover. This internal speech makes the trailer more mysterious and, most importantly, eliminates the need for dialogue between the characters of the trailer, which would mean a much more complex stage of production. In this case, it would be necessary to use microphones and modern audio equipment to prevent problems such as wind noise, low volume of actors' voices or interference from other volume sources. Since the voiceover is recorded in a silent environment, these complications do not arise [6, p. 351]. Finally, the third sound source for the trailer is sound effects. In most cases, they are very subtle, since music and dialogues are louder in most cases than they actually are. However, the presence of these sound effects provides a more complete listening experience and complements the frames and effects of the video very well.
Layout — this stage of the pre-production phase is a key part of the project. An advanced frame was formed so that it would be possible to simply replace the storyboard clips for future final frames. This process is known as offline editing. 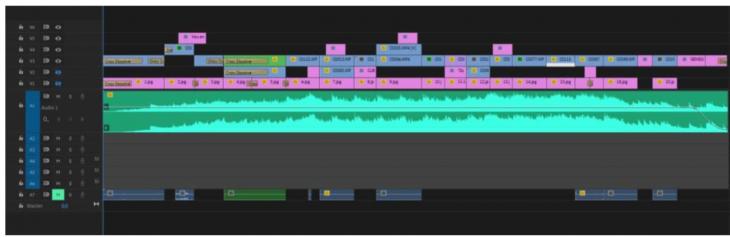
Figure — 6 Trailer layout in Premiere Pro The Premiere Pro project was created (Fig. 6), into which the music and all the frames drawn in the previously made storyboard were imported. With the help of the tools offered by Premiere, the video with the selected transitions was edited and, most importantly, the time of each clip was calculated to match the tempo of the music. This greatly simplified the recording of the frame on the day of filming, because there was information about how many exact seconds each frame required. All the shots were recorded using Sony Alpha7 III, a mirrorless camera capable of shooting with very high quality due to the high sensitivity of the sensor. However, this camera also stands out in the market for the ability to configure various profiles. The lens used is Sony 50mm F1.8. Two main profiles were used in the project: SLog2 and HLG2. The most noticeable difference between these two profiles is the dynamic range of the recorded material (Fig. 7). SLog2 is the most flexible profile of the two, since logarithmic compression allows you to get more information from the scene in order to be able to restore it using LUT in post—production. HLG2 (Hybrid Log Gamma) has slightly less flexibility in color correction, but offers accurate color reproduction and richer colors than SLog2. The latter is a profile that can be used in a project without the need for color management in post—production, but with SLog2 it is almost necessary to change the gradation. 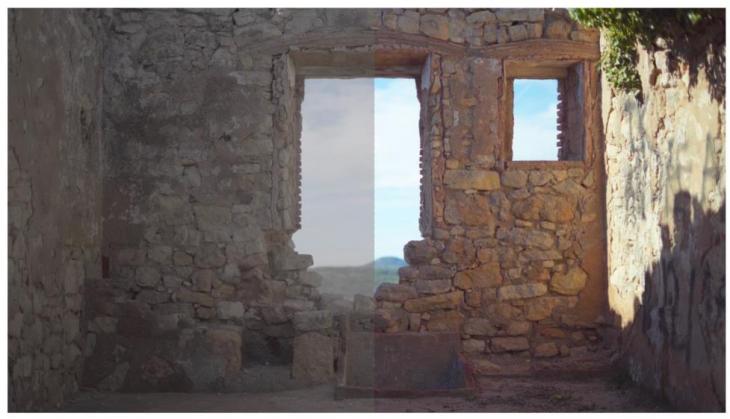
Figure 7 — On The Right: snapshot in SLog2, left: snapshot in HLG2 The ruins scene was shot in SLog2, part of the forest and the cube in HLG2, for the forest, due to its colors, it took a lot of flexibility to change. The other main parameter that needs to be determined is the image size. Most of the pictures were recorded in 4K format (namely 4K UHD — 3840x2160). The ability to shoot at this size meant that later it would be possible to change the position of the frame or also create camera movements, such as zoom in, zoom out. Since the final resolution was planned to be lower, the perceived image quality is not lost when applying these modifications. The only shots that weren't shot in 4K are slow—motion shots. The Sony A7 III can shoot in slow motion at 120 frames per second, but the maximum image size it supports with these settings is FullHD (1920x1080). Nuke offers a useful tool called the masking factor (Fig. 8), which allows you to find out how the video will look in anamorphic format when working in 16:9 format. 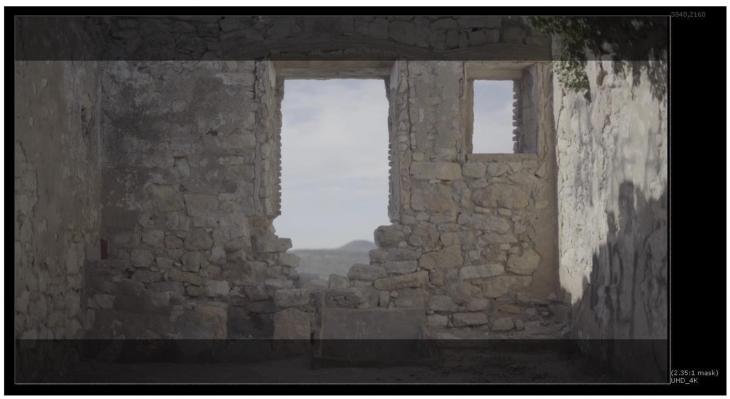
Figure — 8 Disguise Tool in Nuke Thus, the user can see which part of the video sequence will appear in the final version, which will greatly simplify the layout workflow, since it will get rid of the need to work with parts of the frame that will not be visible when exporting. Image modifications can be done in Photoshop using effects such as hue/saturation, brightness and contrast or curves, or they can be done in Nuke using color correction or gradation nodes. The most difficult DMP model in this project was the same as the model with the most difficult work on the rotoscope — climbing uphill. This matte drawing was created exclusively in Photoshop, combining a series of different images from different sources (Fig. 9). 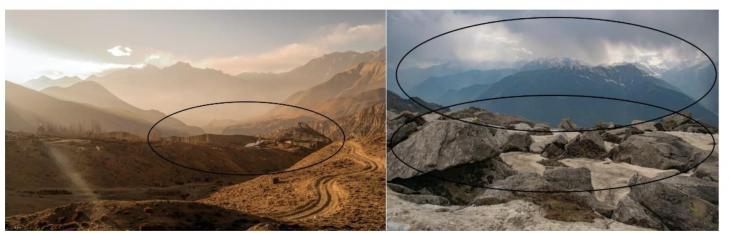
Figure — 9 Image Assets for DMP The first aspect to keep in mind when launching a DMP is a clear idea of the matte finish and an accurate idea of what is the source of inspiration. It was necessary to start with a quick layout drawn in the same Photoshop file to simplify the search for different layers (Fig. 10).
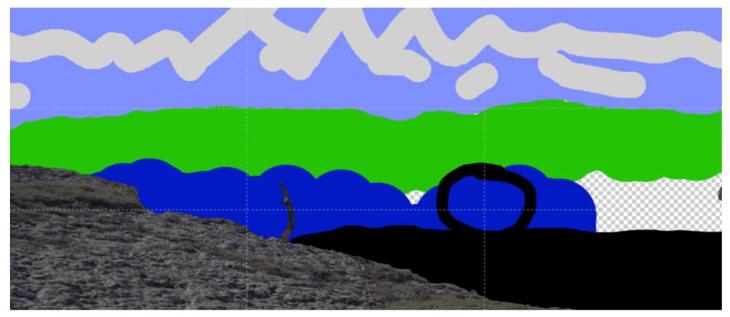
Figure — 10 DMP sketch with all the layers drawn One of the most important things when searching for images is that their lighting matches the original image. As you can see in all the images above that were used in DMP, they all have a light coming from the left. The direction of light is very difficult to manipulate and change, unlike the color, saturation or brightness of the image, so it must be taken into account. The process of creating a frame is shown in Fig. 11, Fig. 12, Fig. 13. 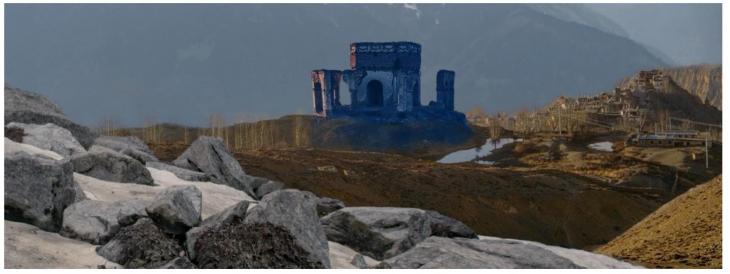
Figure — 11 DMP without effects for integration of elements 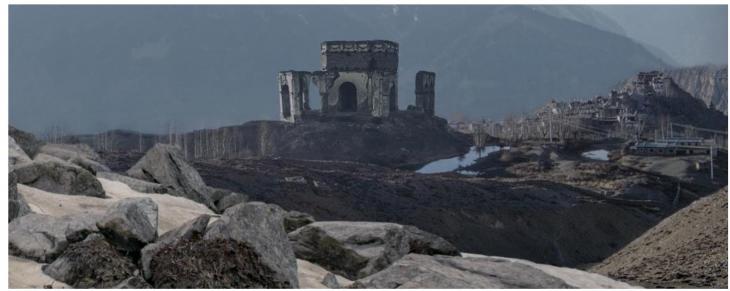
Figure — 12 DMP with all added effects 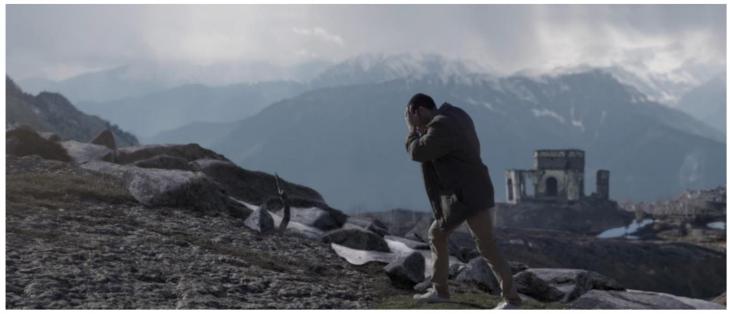
Figure — 13 Final snapshot with built-in DMP When all the layers were finished, it was time to integrate the DMP into the frame. In Photoshop, you can create shadows and highlights to enhance the lighting effect and give the picture a more dramatic look. The three-dimensional part of the project was carried out in HoudiniFX. However, Nuke also played a big role in this process, as before moving to the main 3D software, all the images were exported in .FBX format. A picture was taken in which the cross of the church disintegrates and disappears in the wind (Fig. 14). 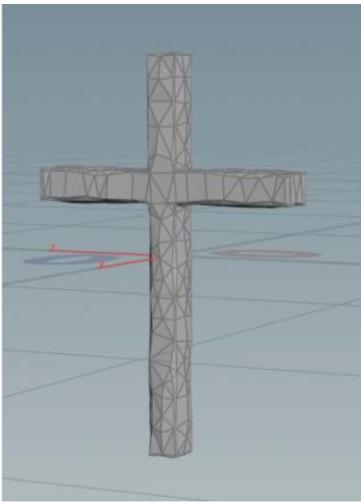
Figure — 14 3D model of the cross The second asset created in 3D was an animated three-dimensional figure that appears on stage in different sizes. The shape was created using a rectangular element, and the edges were obtained using a PolyWire node and squeezed out to get the required width (Fig. 15). 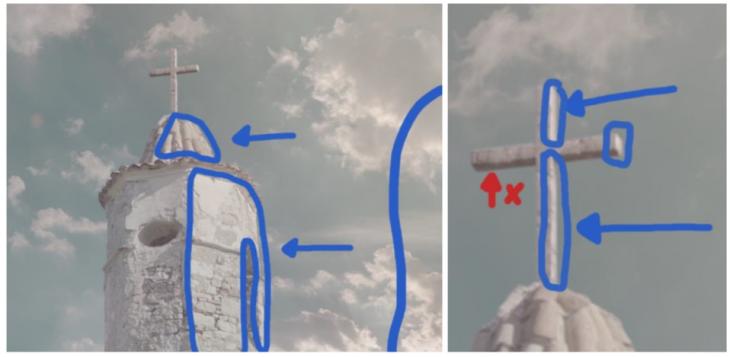
Figure — 15 Light scattering The direction of light is the main parameter to pay attention to. Since it was originally a clear day, the church was well lit from all sides, but the main sunlight came from the right. This meant that rendering would require multiple light sources. The main light in the form of the sun was placed to the right of the cross, as well as low-intensity diffused light so that the shadows were not completely black, since they are not in the church. The shadows on the render were mostly the lower part of the cross, because the sun only illuminates the upper part of the cross. This is indicated by a red marker on the right image. Finally, the third light source that was used was a very diffused light from the front, which illuminated parts of the cross that were neither lights nor shadows. Three—dimensional integration is one of the most important aspects of compositing. Although 3D artists and rendering specialists can do very well done pieces of work, they need to be combined into a 2D snapshot. The image of the church cross has been radically changed since the render appeared, as the texture color of the cross was changed from black to the same color as the church to make it more realistic. A little defocusing and blurring around the edges was also used to make it look like it was part of a church. 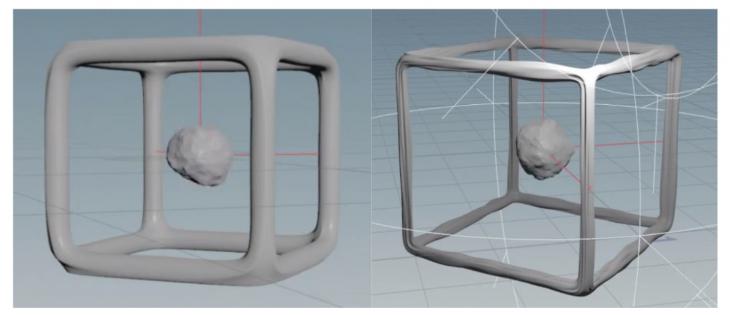 Figure — 16 The first cube and the modified cube The ball of energy in the middle of the cube is a sphere that can be animated afterwards. To make the ball inside the cube (Fig. 16) look like something emitting energy, it was animated, with a node offset parameter with the expression $F * 0.01. The most difficult thing was to make the green light work and maintain a rough texture (Fig. 17). If you put too much light on, the details will not be noticeable, and if the lighting level is too low, the cube will not be illuminated, so we had to find the middle point. 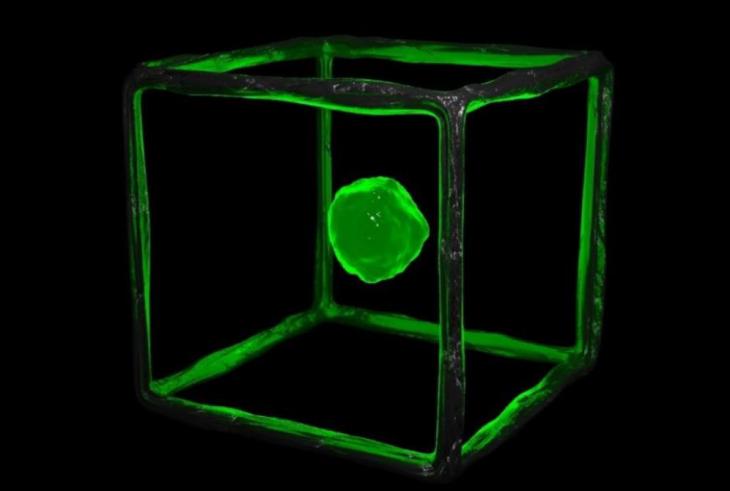
Figure — 17 High-quality rendering of a cube with visible textures The direction of light is the main parameter to pay attention to. It took several light sources to render. The most important use of volumetric light sources in this project was shooting lights coming out of the forest on the horizon. A green ray is a three—dimensional light that is created from a small green circle and goes up. The green circle was created by simply connecting a radial node with the correct color and then combining it with a black background. Then all this was connected to the VolumeRays node, and then the parameters were changed until the desired result was achieved (Fig. 18). 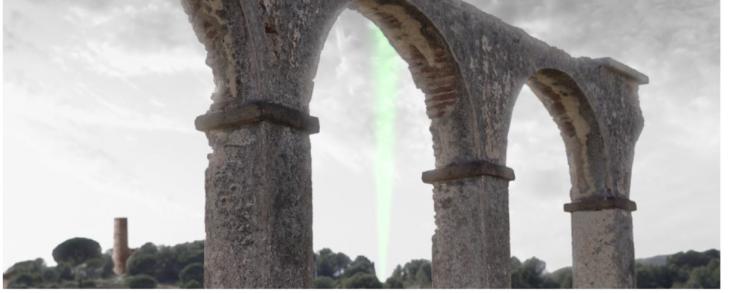
Figure — 18 Final composition The use flicker option makes the beam more organic in accordance with the levels set in the parameters. A smoke asset was also added, combined with the multiply overlay mode. Smoke means that the green light will be animated and will look as if it illuminates the dust in the air. Color gradation is the final part of the visual part of the project. Since the main editing was already done at the stage of creating a layout with storyboard images, it was necessary to focus on color processing. The entire color correction process is performed in Premiere Pro using tools such as predefined LUT and Lumetri Color. Conclusions. Thus, it is advisable to implement graphics and design tools in video through the use of visual effects modeling methods and 3D modeling in Houdini, the creation of realistic matte paintings in Photoshop and video compositing in Nuke. This software will become the core of the project, since it is in it that everything will be combined into one final clip due to the high-quality integration of various objects in the scene.
References
1. Glazova, M. S., Savel'yeva, O. O. (2017). Trailer: advertising campaign or mini-film? Nauka televideniya, 13–2, 78–92. [in Russian].
2. Ivanova, A. V. (2018). Technologies of virtual and augmented reality: opportunities and obstacles of application. Strategicheskiye resheniya i risk-menedzhment, 3, 88–107. https://doi.org/10.17747/2078-8886-2018-3-88-107. [in Russian].
3. Lugovtsev, A. Yu. (2019). Nostalgia for novelty. Design and special effects in cinema. Mezhdunarodnyy zhurnal issledovaniy kul'tury, 3(36), 154–169. https://doi.org/10.24411/2079-1100-2019-00041. [in Russian].
4. Lugovtsev, A. Yu. (2019). Design of screen objects and synthesis of screen technologies. Telekinet, 3(8), 27–31. [in Russian].
5. Luriya, R. (2018). Some features of video filming and editing of a theatrical production. Alleya nauki, 2(1), 838–841. [in Russian].
6. Malysheva, N. L. (2017). Cinema as a key to understanding the art of performance. Yaroslavsky pedagogicheskiy vestnik, 1, 350–354. [in Russian].
7. Ovchinnikova, R. Yu. (2019). Graficheskiy dizayn v oblasti primeneniya kul'tury i novykh tekhnologiy. Manuskript, 12(5), 188–192. Retrieved from https://gramota.net/materials/9/2019/5/40.html [in Russian].
8. Petrukhina, O. V. (2019). Graphic design and virtual environment: reality and perspectives. Filosofiya i kul'tura, 1, 13–19. [in Russian].
9. Simakov, V. (2008) Dynamics of video objects. Iskusstvo v shkole, 4, 53–55. [in Russian].
10. Sukovatykh, G. A. (2017) Functional features of a modern cinema trailer. Vestnik RGGU. Seriya: Literaturovedeniye. Yazykoznaniye. Kul'turologiya, 10 (31), 280–288. [in Russian].
Peer Review
Peer reviewers' evaluations remain confidential and are not disclosed to the public. Only external reviews, authorized for publication by the article's author(s), are made public. Typically, these final reviews are conducted after the manuscript's revision. Adhering to our double-blind review policy, the reviewer's identity is kept confidential.
The list of publisher reviewers can be found here.
This article is devoted to a rather interesting problem of the formation of visual images, which is relevant during the period of widespread and introduction of clip thinking, which is currently becoming dominant among a significant number of young, adolescent and mature people. One can argue a lot and talk about the harm of the clip worldview (by the way, this is quite an interesting, but still practically unexplored field of practical psychology), but the very fact of the ubiquity of the clip approach to the world is an obvious fact. The mass media plays a leading role in this process, and, naturally, it is the "visual" forms of information that represent the main driving force of this type of worldview and lifestyle. Representatives of the media business have long understood this (no wonder, the video series is a "dream factory"), therefore, the creation of various virtual and augmented realities is currently a very widely developed business in which huge funds are invested, and these investments fully justify themselves, because they form a variety of behaviors widely spread by different media information is currently available. In fact, clip thinking is the currently dominant ideological form that creates existing social stereotypes and affects the picture of the human world, manipulating his behavior and consciousness in a given direction. In this regard, it is necessary to carefully analyze the ways of video effects on the cognitive picture of reality and analyze the improvement in the quality of created video products to date. Much attention has been paid to this by researchers and practitioners in the field of graphic design, and this issue is of fundamental importance in the context of the aggravation of the information war caused by the prevailing socio-economic and socio-political situations. In the work, the author proceeds from a comparative research model, and focuses on such important elements of the formation of a visual series as (based on the degree of dissemination of these software products): - visual effects modeling and 3D modeling in Houdini; - creating realistic matte paintings in Photoshop; - video compositing in Nuke. It should be specially emphasized that the central theme of this article is the technological aspect, that is, the main attention is paid to those technologies that are used to form a visual series that forms a clip target of consciousness. As a practical example, there are numerous trailers advertising a particular movie production. The study examined the trailer for a post-apocalyptic fantasy film called Genesis, in which the two main characters are depicted as opposites. The work is written in a fairly understandable language, there is an appeal to both the positions of supporters and counterarguments, because there are a number of opinions about what goals and objectives should be implemented using various trailers. It is regrettable that the author is based solely on domestic authors as sources, because this problem remains practically unexplored in our country, while there is a huge foreign bibliography devoted to this problem, most of which has not even been translated into Russian. But in any case, I believe that this work will be of interest to a certain audience of the magazine, although not everyone will agree with the approach proposed by the author.
| 


